


Are you a modern music producer looking for ways to enhance the snare drum mixing and mastering process?
When it comes to the mixing and mastering process on snare drums, there are many ways this can be achieved.
Here at ProducersBuzz we wanted to highlight the best strategy and free audio plugin which can be used for mixing and mastering snares.
Indeed, mastering the snare drum samples or loops requires a main output requirement by the music producer or the sound engineer. This means that the music producer needs to understand what type of sound signal output they require. This could be;
- Warm snare mastering.
- Mellow snare mastering.
- Subtle snare mastering.
- Punchy snare mastering.
- Bright snare mastering.
- Crispy-sounding snare mastering.
The main goal is to determine which snare is required for each project; some modern genres will have different types of snare mastering processes, all determined by the main sound signal output requirement.
Also, there is no right or wrong when it comes to mixing and mastering snares. But this is a creative process which requires patience.
For this example of mixing and mastering a snare drum tutorial, we will be using a free-to-download, royalty-free drum snare sample from the Unison Kit. We have listed free drum kits which can be used for profit with royalty-free attributes below. We would highly recommend these two drum kits for modern music production.
Examples of Snare Drum Mastering.
Before the original snare drum sample.
After applying the mastering to the snare drum
1. With EQ (shown below).
2. With added reverb (shown below).
3. With added stereo (shown below).
4. With added compression (shown below).
We have used 4 sets of stack effects inside FL Studio; certainly, these stack effects can also be used in Logic Pro, Cubase, Reaper, Ableton Live and many other major DAWs. Image shown below.

1. Adding EQ mastering to a snare drum.
When it comes to adding EQ mastering to a snare drum, there is no right or wrong, as this is determined by the producer and the main outcome requirement of the musical project.
For this instance, we have decided to make the snare drum bright using simple EQ settings with Buzz Adv EQ Pro VST, which is free to download and free to use. This is one of our official free VST plugins. Check out the settings on Buzz Adv EQ Pro VST below.
 The modulation settings used are listed below; these will make any snare sound brighter and slightly warmer.
- B1 Frequency: 60.0 Hz, gain: -3.0 dB and Q of 1.0.
- B2 Frequency: 150 Hz, gain of 5.5 dB and Q of 1.5.
- B3 Frequency: 400 Hz, gain of 3.9 dB and Q of 1.0.
- B4 Frequency: 2000 Hz, gain of 3.0 dB and Q of 2.7.
- B5 Frequency: 6000 Hz, gain of 3.2 dB and Q of 0.5.
- B6 Frequency: 12000 Hz, gain of 6.1 dB and Q of 1.0.
- In-gain set to 0.0.
- high-pass set to 50.0 Hz.
- Low-pass set to 20000 Hz.
- Out-gain set to 0.0.
These are the modulation settings inside Buzz Adv EQ Pro VST, which can be downloaded and used for free.
2. Adding Reverb mastering to a snare drum.
With EQ completed on the snare drum, we have added a reverb effect which will add realism to the snare drum during the mixing and mastering process. Adding reverb can make live performance-style drums, rock, rap and hip-hop, and pop-style music production stand out overall.
The main thing we would like to point out is to not add too much reverb to the snare drum; professional music producers usually like to add slight reverbs to snare drums but not overpower them at the same time.
Overpowering the snare drums during the mixing and mastering process with reverb would make the whole drum pattern or drum samples sound unrealistic and simply make the whole drum pattern sound horrible.
We have used the Buzz Reverb VST plugin, which is also free to download. This is one of our official VST plugins, which we have released completely free for all music producers to use. Check out the full reverb modulation settings below.
 The modulation settings have been outlined below.
- Room size 0.16.
- Damping 0.24.
- Pre-delay 5.00 ms.
- Wet level settings: 0.40.
- Dry level modulation, 0.60.
- Width 0.70.
- In-gain 0.80.
- Output gain: 0.00.
- Mix 73.00%.
These are the settings we have used to showcase a subtle reverb; this is quite a strong reverb. We would recommend the mix level to be these settings below with the same modulations above for certain genre music production types.
- Modern rap and hip-hop genre productions set the mix between 5% and 25%.
- Live rock or industrial-style genre: set the reverb mix between 20% and 80% as required.
- For modern EDM, trap or pop music genre production, set the reverb mix between 5% and 10%.
- Trance- or dubstep-style genre productions: set the reverb mix between 3% and 30%.
3. Add a stereo effect to the snare drum.
During some modern music production mastering processes, many creative music producers add some form of stereo effect to their snare; of course, this is optional. This stereo effect can add a 3D dimension to the snare, uplifting the whole drum pattern.
The snare can sit in the middle of the mix but can also optionally contain a stereo effect. A subtle and soft stereo effect would be ideal, as adding too much stereo effect to a snare drum can make the snare drum sound unrealistic.
We have used the free KHs Stereo effect, which is part of a suite of 32 free mixing and mastering plugins. Yes, all 32 of these are free to download and free to use.
Check it out in the image below.
 The modulation settings are listed below.
- Mid set to 100% input.
- Width set to 176% input.
- Pan let in the centre set to “C” as shown above.
This will add a subtle and gentle stereo effect to the snare, which can also be used with the same modulation settings for the percussions and instruments if required.
Of course, adding a stereo effect to the snare drum during the mixing and mastering process is optional.
4. Add compression to the snare drum.
We have added a subtle and smooth compression to the snare drum, making it sound smoother and not too harsh.
We have used DCAM FreeComp, which is a free compressor VST audio plugin, a great free compression plugin designed for mixing and mastering.
Of course, adding the compression above the reverb would be ideal within the channel effects stack; we have simply added this near the end of the stack to modulate the whole overall effect, including the reverb, to make sure everything is compressed correctly.
Check it out below for a reference.
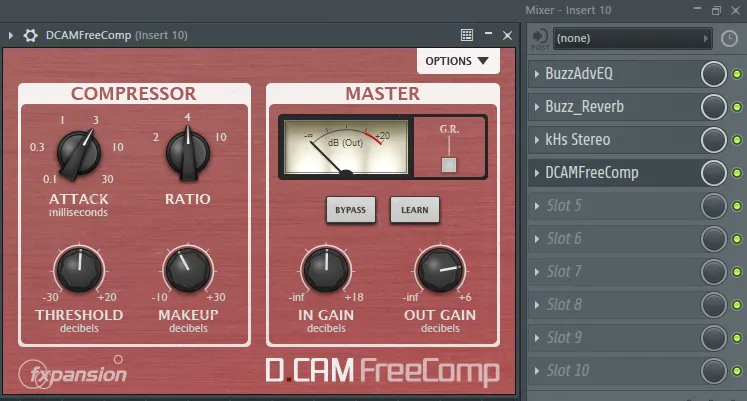
The modulation settings of D Cam FreeComp for snare mastering are listed below.
- Attack set to 3.
- Threshold set to -4.50.
- Ratio set to 4.
- Makeup set to 5.60.
- Input gain to 0.0.
- Output gain to 0.0.
The main outcome of mixing and mastering snare drums
When it comes to mixing and mastering snare drums for any style of genre music production musical projects, we would recommend adding EQ, reverb, stereo effect and compression.
Adding the stereo effect is completely optional, as most modern musical compositions don’t contain such an effect, yet using this effect can be a creative way of mixing and mastering.
Here at ProducersBuzz we wanted to showcase a full step-by-step recommendation guide on mixing and mastering snare drums, which can be used for all types of musical genres and sound engineering procedures.
The main mastering experience of this process should enable the music producer to freely experiment with the mixing and mastering modulation inputs, and also have fun when mixing and mastering the snare drum, there is no right or wrong, it’s all creativity!


